Simple NAS Recovery
This tutorial covers the most simple NAS recovery case.
It applies to off-the-shelf NASes using any filesystems supported by Klennet Recovery.
It may or may not apply to your particular DIY NAS.
If you build the NAS yourself, you would know.
If someone else built your NAS for you, ask that person for help.
The most complicated parts of the process are at the beginning.
You need to connect your drives (both source and target), then figure out the partition layout and RAID configuration.
After that, the process is pretty much automatic.
This tutorial is applicable only in the case where the partition tables are intact.
If you don't see your data partitions, you should proceed to the RAID analysis instead.
Preparing source disks
The first step is to remove the disks from the NAS and connect them to the PC for recovery.
-
You must connect all the disks simultaneously unless you are recovering an Unraid system.
If at all possible, avoid using USB-to-SATA adapters. Use regular SATA connections instead.
-
When removing disks from the NAS, make sure to label the disks and their corresponding bays.
While all NASes I know recognize the array if you shuffle the disks,
the labels may be helpful later for other purposes (e.g., troubleshooting a faulty drive bay).
Once the disks are connected, it is prudent to examine the SMART status of all the disks.
You should then make clones or images of any disks that have reallocated sectors, pending sectors, or look otherwise disagreeable.
Preparing target storage
You need a storage device with enough free space to fit all the data you want to recover.
It can be a direct-attached SATA drive, a direct-attached RAID array, or a network share.
Refer to this page if you plan to recover onto a network share.
While USB drives tend to work better as a target than as a source,
I still recommend using SATA instead of USB whenever possible.
Figuring out the partition tables
Most off-the-shelf NAS devices partition their disks following the same schema. On each disk, there are
- One small partition at the start holds the NAS operating system;
- (optional) one or several small partitions for the swap or other scratch space;
- big main data partition;
-
(optional) small partition at the end,
sometimes used as padding to accommodate disks of slightly different sizes in the same array.
In short, you are only interested in the largest partition on each disk.
This is the one holding your data. The rest is just noise.
I will still describe the system partitions so that you can orient yourself in the layout, but remember you only need the largest one.
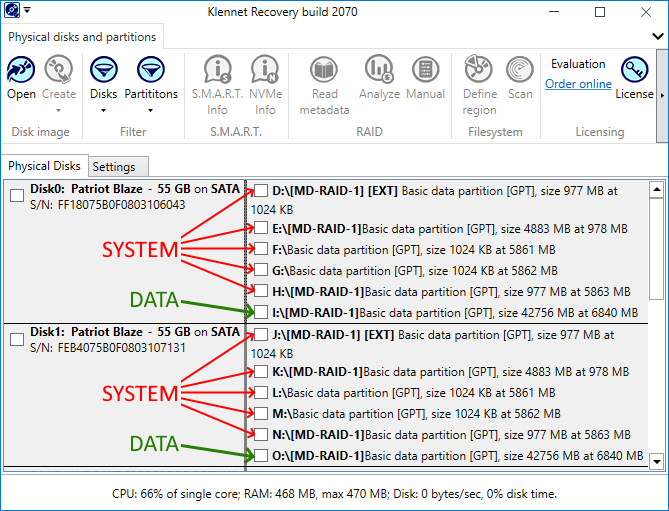
Partition layout from the two-disk Buffalo NAS
The screenshot above shows the view of the partition tables from a two-disk NAS.
The partition tables are fully intact in this example.
Windows assigns a drive letter to all the partitions,
even though it cannot read the contents and will not write to them.
While it may be annoying, it is not harmful unless you format one of these partitions.
Please do not ever format anything while recovering data.
So, here we have five pairs of system partitions, some arranged in RAID1 pairs and some independent.
You can quickly identify pairs as the members have the same size and starting offset on their corresponding physical disk.
Then, there is a data partition, also a RAID1 pair.
In your case, the RAID level may be different, especially with more disks.
The default RAID level for two disks is typically RAID1, and the default for three is typically RAID5.
For four or more, it will be either RAID5 or RAID6, depending on the model of the NAS.
However, the RAID level only changes on data partitions.
System partitions are generally arranged in N-way RAID1 arrays, regardless of how many disks are in the system.
The data partition is easy to spot as it is the largest by far.
In this example, the data partition size is 42756 MB, while the largest of the system partitions is 4883 MB.
Select the data partitions on all disks, proceed to the next step.
Reading RAID metadata and scanning the array
Mark all the data partitions and read RAID metadata by using the
Read button in the RAID section of the toolbar.
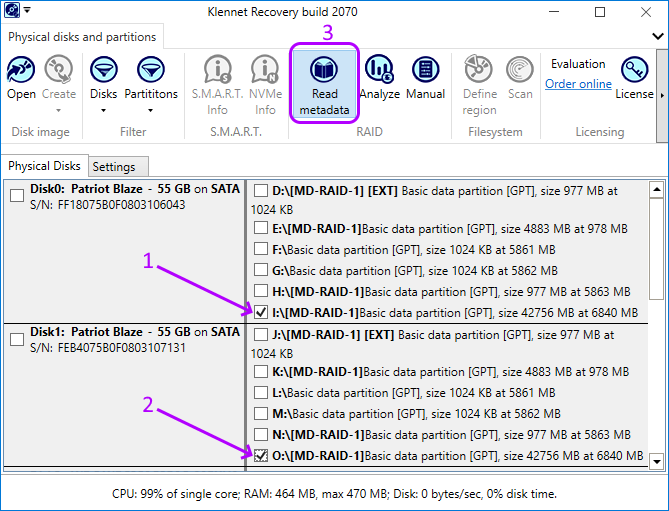
NAS disk and partition view with the data RAID members selected
This should produce a single RAID volume. You should select it and start scanning, as illustrated below.
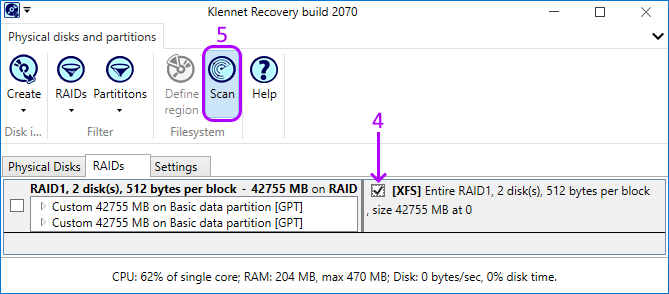
Reconstructed RAID view with the array selected for scan
Please note on the screenshot above that Klennet Recovery detected that the array contains an XFS filesystem with no partition table.
So Klennet Recovery created a dummy partition covering the entire array to represent the filesystem.
It is not important if you select the left side (RAID) or the right side (dummy partition),
as both sides represent the entire contents of the same RAID set.
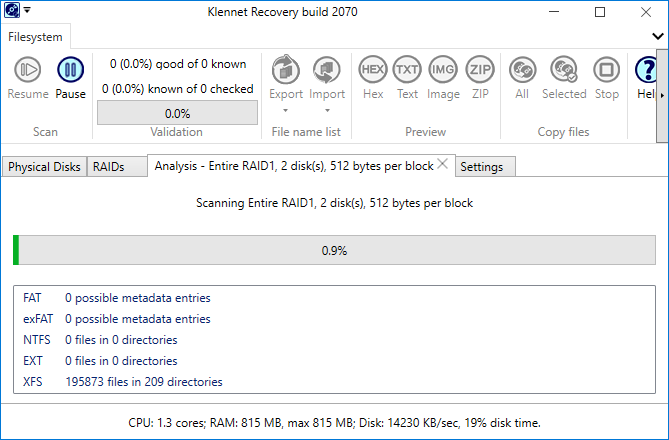
Filesystem analysis progress
The scan progress looks like in the screenshot above and takes several hours.
It should not take longer than a day or so.
If it runs longer than that, please submit a support request.
Selecting and copying files
After a while, Klennet Recovery will arrive at the filesystem view.
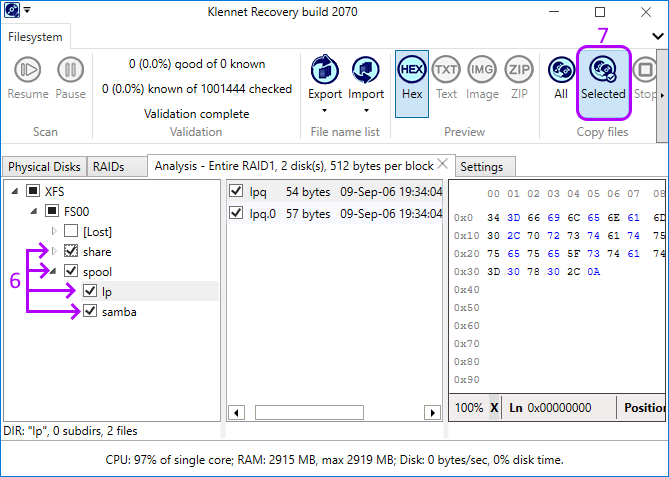
File and directory tree view
In a filesystem view, you can examine the recovered files and directory structure, preview files to a certain extent, and select files you want to copy to some safe target storage.
Click Copy files - Selected on the toolbar to copy the selected files.
For more details on the filesystem view, refer to the corresponding manual page.
If the partition tables look okay, but at the end of the analysis there are no files detected,
please submit a support request.