Analyzing block map in RAID0
This is an example of block map and disk order analysis in a RAID0.
I originally used my Klennet RAID Viewer, but it is now discontinued.
However, the functionality is now integrated into Klennet Recovery
and is available in the evaluation version.
The disk set contains four drives from the RAID0 plus one extra drive unrelated to the array.
We already determined the RAID block size and start sector in the previous episode.
1. Default view
The screenshot below is what I had once I switched from the start sector and block size view to block map view.
This looks mildly complex, but the repeating pattern is visible already.
Let's see what we can find from here.
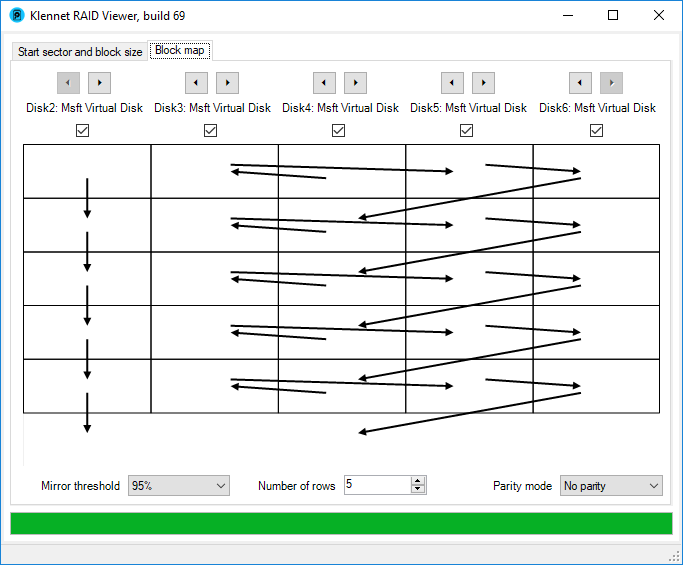
Initial block view for a RAID0 sample.
First, the leftmost drive (labeled Disk2, near the top of the window) is not related to the RAID.
This is a typical behavior of a drive that is either not related to the RAID or blank (often a hot spare).
Ignore this drive.
I prefer to exclude it from the display by removing the checkmark under the drive name, but that's optional.
Excluded drives are conspicuously marked, as seen in the screenshot below.
2. Reordering
With the extra drive now out of the way, let's sort four RAID drives.
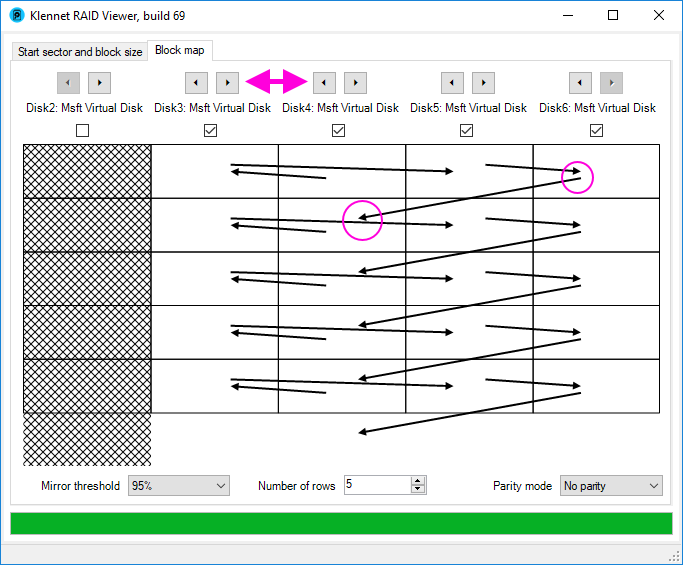
Reordering disks in a RAID0 sample.
In each row of a RAID0 with N drives, there are N-1 transitions to the next block in the same row
and one transition to the next row. This latter transition is the key to RAID0 ordering.
It always goes from the last block in a row to the first block in the next row.
So, the ordering process for the RAID0 is as follows:
- Identify the transition between rows. You are looking for an arrow which
- goes from one row to the next row and
- repeats on each row.
I have circled starting and ending points in the screenshot above.
- Arrange the drives so that the arrow goes from
the last drive in the upper row to the first drive in the lower row.
This is done by using the drive ordering arrow buttons at the top of the screen.
- After you arrange the transition between rows,
arrange the remaining drives so that all the other
arrows form a chain from the first to the last drive.
3. Final result
After reordering, we arrive at a very orderly map, shown in the screenshot below.
The correct RAID block maps have sort of an orderly, symmetric look.
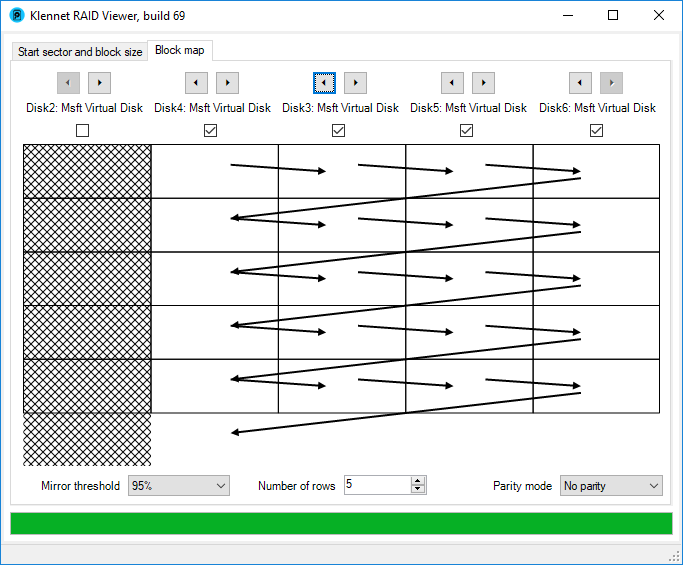
Final block view for a RAID0 sample.
From here, we can read the correct disk order easily:
Disk 4, Disk 3, Disk 5, and Disk 6.
And this completes the analysis for this case.
You can then put this disk order, block size, and starting offset into whatever data recovery software you use.
Continue to a simple RAID5 example.
Filed under: RAID.
Created Tuesday, October 2, 2018