This page covers both the Physical Disks view and the RAIDs view.
Physical disks view is what you see when you start Klennet Recovery.
RAIDs view is initially hidden and becomes available after you produce some kind of RAID by either
reading RAID metadata, doing RAID analysis, or manually constructing a RAID.
The general principles are identical in both views.
However, only Create disk image,
Filters, and Filesystem sections are available in RAID view.
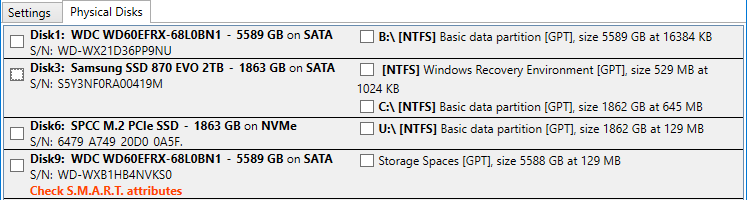 Example Klennet Recovery disk list view.
General layout and logic
The list is divided into two columns. The left side shows physical disks, and the right shows the corresponding partitions for each physical disk.
Each physical disk and each partition have a checkbox next to them.
The toolbar actions work on the checked disks or partitions.
Depending on what exactly is checked, some actions are not available.
For example, a filesystem scan is unavailable when multiple partitions are selected,
and RAID analysis is unavailable if only one disk is selected.
While you can technically select both disks and partitions simultaneously, you should not normally do so.
Select from either the left side or the right, but not both.
This is because:
-
Scanning a disk and a partition on the same disk simultaneously is counterproductive.
It causes double processing of the same data, and on a rotational drive, speed collapses due to excessive seeking.
-
If one of the disks in a set has its partition table damaged,
consider the Steal partitions tool to replicate the partition table from an intact disk of the set.
View details
For a physical disk, Klennet Recovery shows the following data:
- Windows disk number, same as in Windows Disk Management;
- model name;
- disk size;
- bus type used for connection (e.g. SATA, SAS, USB, RAID, and so on. Not all features are available on all bus types, e.g. S.M.A.R.T. is only available on SATA);
- serial number;
- RAID metadata cue, if there is any RAID metadata on this disk.
If the S.M.A.R.T. query for the disk reports reallocated sectors,
the disk information entry also includes a "Check S.M.A.R.T. attributes" warning.
Refer to the S.M.A.R.T. information page for more information if you see this warning.
For a RAID, the left side displays the RAID layout, block size, and disks forming the RAID.
A partition entry contains the following information:
- drive letter or mount point if the partition is currently mounted;
- partition type, as indicated in the partition table, along with partition table type (MBR or GPT);
- partition size and starting position on the disk;
- filesystem type, as detected from the boot sector, if available;
- RAID metadata cue, if there is any RAID metadata on this partition.
RAID and filesystem type cues
If at a glance, it looks like a partition or a disk contains RAID metadata, a filesystem boot sector, or both,
the cue will be displayed next to that disk or partition.
When you see these cues, it is probably worth trying to Read metadata to access the corresponding RAID arrays.
However, the cues do not guarantee that RAID metadata is readable, consistent, and produces readable arrays.
Possible RAID metadata cues are
[MD-RAIDx] for Unix md-raid metadata. The cue will also show the RAID level, as it is readily available.[LDM-RAID] for
LDM, Microsoft Dynamic Disk software RAID.[DDF-RAID] for hardware RAID controller metadata (LSI, Promise, and some other RAID controllers).[ZFS: PoolName] for disks or partitions that are part of a ZFS pool "PoolName".
ZFS and MD-RAID cues work with either disks or partitions. LDM and DDF work only with disks, not partitions.
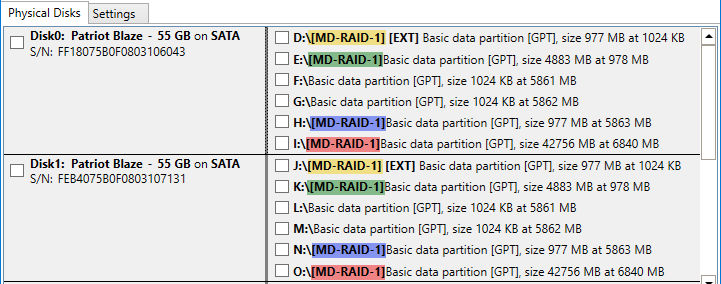 An example view of multiple MD-RAID mirrors, highlighting RAID cues for different mirror pairs.
Typically, the partitions corresponding to members of the same software RAID array are of the same size and start at the same offset.
Filesystem
Scan
Start scanning the selected disk or selected partition, looking for files.
Klennet Recovery processes all filesystem types, except ZFS, simultaneously, so you do not have to choose the filesystem type.
ZFS analysis is started by the next control group.
While it is technically possible to run several scans of the same or different disks or partitions in parallel,
I strongly recommend that you avoid it, unless you are recovering a multi-disk BTRFS filesystem.
The scans are resource-intensive, and running several of them simultaneously slows down the overall process.
ZFS
Quick and Normal
Starts the corresponding ZFS analysis on the selected set of disks or partitions.
For more details, refer to the ZFS recovery page.
Tools
Refresh
Clicking the Refresh button will
- Remove from the list all disks which are no longer readable (as long as no open tab uses these disks).
- Add any newly connected disks to the list (e.g., if you plugged in a USB drive).
Define region
This command creates a simple partition (defined by its starting position and size) on the selected disk.
You cannot create a partition based on another partition.
This function is useful if you want to limit the scan to only a part of the disk:
-
If you know the end of the disk is blank.
For example, when using a disk clone larger than the original disk,
it is reasonable to limit the search area to the size of the original disk.
-
If you want to take a quick peek on what's inside before committing to a full scan.
The results will not be complete, but can often tell you if you are on the right track.
Specifically, this is useful to distinguish between ZFS and other filesystems.
For this purpose, make your scan region between 100 GB and 300 GB in size.
Steal partitions
Partition stealing takes several hard drives and makes all their partition tables identical.
If a partition exists on at least one drive, it gets replicated onto all other drives.
These changes only occur in memory; Klennet Recovery does not change the partition tables on the disks.
Partition stealing is helpful when recovering a multi-disk NAS with damaged partition tables.
As long as at least one disk has its partition table intact,
you can borrow the intact partition table and use it with other disks.
This technique has a good chance of success because NASes often use identical partition
tables for all drives of the same set.
Filters
Filters are helpful if you have many disks in the system.
You can filter disks, partitions, or both, by disk model, capacity, bus type, and other characteristics.
If the filter is active, its corresponding button is highlighted in red,
indicating that only a subset of the view is currently visible.
S.M.A.R.T. and NVMe device health information
These two buttons open S.M.A.R.T. or NVMe self-monitoring
detail pages if exactly one disk is selected and the disk is capable of self-monitoring.
RAID
This section deals with RAID analysis.
Select at least two drives or two partitions for the RAID operations to become available.
Read metadata
Read known RAID metadata, if any, from selected disks or partitions.
The following metadata formats are supported:
- DDF (Common RAID Disk Data Format), used by LSI and Promise RAID controllers (select physical disks);
- md (Linux software RAID) (most often on partitions, but sometimes on physical disks);
- LDM (Windows dynamic disks) (select physical disks).
- LVM2 (Logical Volume Manager), used in NASes and under Linux in general for volume management (select physical disks or partitions; LVM2 is also used on top of md arrays).
Analyze
Start RAID analysis on the selected disk or partition set.
Use this option if the array metadata is unavailable and you do not know the parameters.
See the RAID analysis page for more details.
Manual
Manually define a RAID on the selected disk or partition set.
Use this option if the array metadata is unavailable, but you know the correct parameters.
See the Manual RAID definition page for more details.
Disk image
Open disk image
This command opens a disk image file and enumerates the partitions on the image.
Klennet Recovery supports the following disk image formats:
- raw disk image (plain copy of the disk);
- VHD (fixed size or dynamic);
- VHDX (fixed size or dynamic).
Any unsupported format is opened as a raw disk image.
It will likely not work and no warning is given.
Specifically not supported formats include:
- Any kind of multi-part disk image, split or versioned;
- E01 images.
Create disk image
This command asks you for the target disk image format and file name and opens
the integrated disk imager.
Refer to the imager manual page for more details about the procedure.
Next steps
You should select the disk or partition you want to analyze (or a set of them, if you need multiple at once).
Once the selection is made, usual choices are these:
-
For dealing with a filesystem:
-
For dealing with a RAID: